![Logo AttriX Bleu.svg]](https://support.attrix.ca/hubfs/Logos/AttriX/Logo%20AttriX%20Bleu.svg)
The HRN-GS09K2 is a German T-harness kit with four mounting brackets designed to install a Geotab® GO device in most heavy-duty vehicles globally. The HRN-GS09K2 includes four mounting adapters with engraved numbers for quick reference.
WARNING: IMPORTANT NOTES!
This harness is compatible with most heavy-duty vehicles between 2006 and 2021. If your vehicle was manufactured after 2021, you must consult your manufacturer to validate the location of the RP1226 connector that must be used to connect the Geotab modem.
At no time will AttriX be held responsible for damages or codes caused by improper installation or the use of the wrong harness.
Refer to Geotab's complete installation document.
Using the wrong harness or improper installation between the ECM and the Geotab device can result in various issues such as:
- Loss of GPS signal
- Loss of connection between the vehicle and the device
- No or loss of odometer readings
- No readings of engine measurements
- No reading of engine faults
- No creation of automatic statuses (Geotab Drive) as required in the DCE/ELD mandate
- No or loss of ignition readings
- Etc.
WARNING! Use Geotab telematics devices only with harnesses approved by Geotab acquired from authorized Geotab dealers. Using non-Geotab harnesses from unauthorized sources can pose serious safety risks, including fire, and may result in severe injury and/or vehicle damage. It is the responsibility of the vehicle operator to install the Geotab device according to the vehicle's technical standards. Harnesses may vary from model to model.
The HRN-GS09K2 is a German T-harness kit with four mounting brackets designed to install a Geotab® GO device in most heavy-duty vehicles globally. The HRN-GS09K2 includes four mounting adapters with engraved numbers for quick reference. The names of the adapters are as follows:
|
Adapters
| 1 | 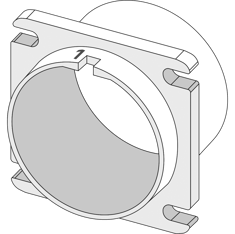 |
2 | 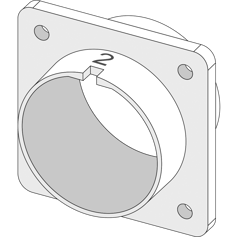 |
| Flange and screw mounting | Extended flange and screw mounting | ||
| 3 | 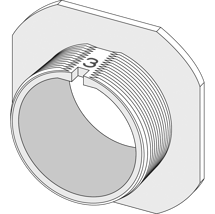 |
3N | 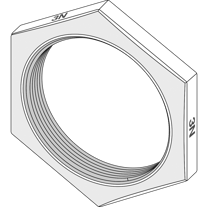 |
| Flange and thread mounting | Flange and thread mounting with nut | ||
| 4 |  |
4N | 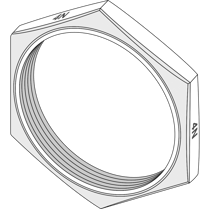 |
| Thread mounting | Threaded mounting nut | ||
Installation Instructions for the Harness
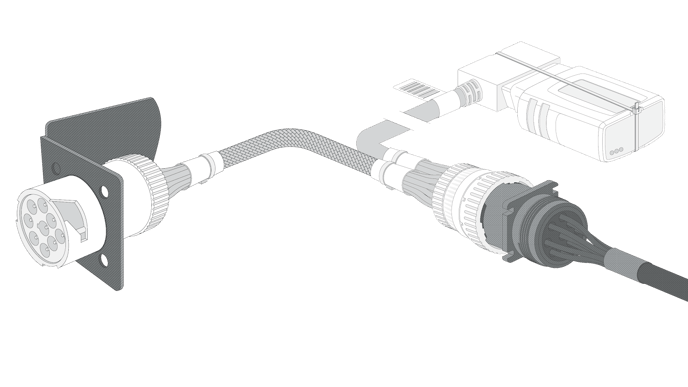
| 1 | Start with the Geotab GO device unplugged from the vehicle. Remove the vehicle's diagnostic connector from its bracket. Note: Not all heavy-duty vehicles use the same connection system to secure the vehicle's diagnostic connector to its bracket. Always follow the installation or uninstallation method suggested by the connector and bracket manufacturer. |
 |
| 2A |
Insert the male connector of the HRN-GS09K2 harness into the vehicle's bracket and secure it in place (using the appropriate connection method). If you are securing the adapter with screws, this method will apply to adapters 1 and 2. Note: Adapter 1 is pre-installed on the male connector of the harness. Always use the adapter that matches the shape of your vehicle's diagnostic connector. For steps on how to change the adapter, see the "Adapter Change" section below. |
 |
| 2B | For heavy-duty vehicles that require adapter 3 or 4, the male connector can be secured inside the vehicle's bracket using nuts 3N and 4N provided in the HRN-GS09K2 kit. These nuts are NOT interchangeable and can only be used with the corresponding adapter. | 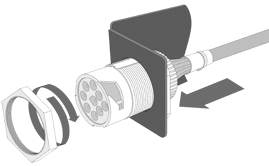 |
| 3 | Connect the GO device to the universal 16-pin female connector (long end) of the harness. | 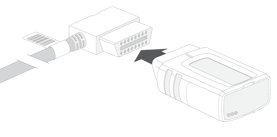 |
| 4 | Connect the vehicle's diagnostic connector to the female connector of the HRN-GS09K2 harness and secure it in place using the locking ring on the female connector of the harness. | 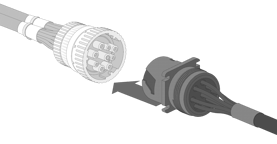 |
Configuration completed.
Adapter Change
If your vehicle does not use the pre-installed adapter 1, follow the steps below to replace the adapter with the required version. No special tools are required to change the adapter.
✱ NOTE: Ensure the harness is disconnected from the vehicle before changing the adapter.
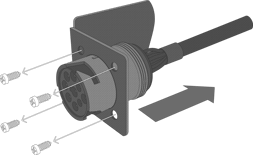
| 1 | On the male connector of the HRN-GS09K2 harness, remove the threaded cap located at the rear of the connector, then slide it away from the connector. | 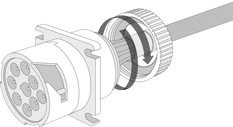 |
| 2 | Slide the connector forward and away from the terminal cartridge. Be careful not to damage or displace the 9 terminations inside. This will facilitate reinsertion into the male connector. | 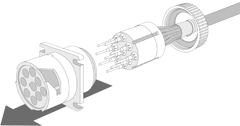 |
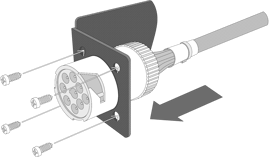
| 3 | Hold the connector and pull the adapter (adapter 1 in this case) backward away from the male connector. |  |
| 4 | Insert the desired adapter onto the male connector. Ensure the adapter is properly oriented to slide into the notch of the male connector. | 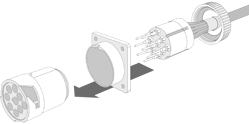 |
| 5 | Carefully replace the male connector into the terminal cartridge. Align the two slots on the sides of the terminal cartridge with the slots inside the male connector. | 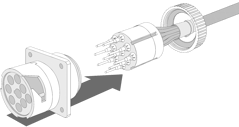 |
| 6 | Screw the cap back onto the rear of the connector. Ensure the connection is tight and there is no space between the adapter and the threaded cap. | 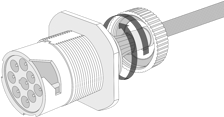 |