![Logo AttriX Bleu.svg]](https://support.attrix.ca/hubfs/Logos/AttriX/Logo%20AttriX%20Bleu.svg)
Before troubleshooting, please follow the steps below to gather all the necessary information about the problem.
- The faulty Geotab device's serial number
- The type of vehicle (model, year and engine) in which the Geotab device is currently connected.
- The type of harness that is installed between the OBDII port and the Geotab device
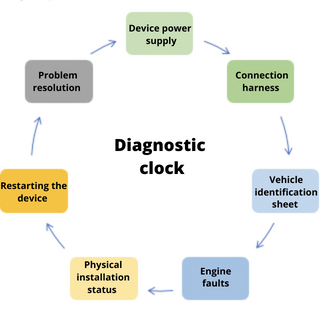
- Tracking the diagnostic clock
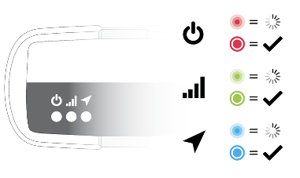
When checking the installation, it is important to have access to the device and to make sure that the vehicle's ignition is on. Once the device is connected and powered, 3 lights should be on. If none of the lights are flashing, the device is not powered.
After the initial flashing, the green light will briefly turn solid to indicate that the modem is connected to our servers. The blue LED also lights up briefly to indicate that the GPS is working. Both LEDs will eventually go out if the ignition is turned off.
|
Red LED - Device configuration Green LED - Cellular network connectivity Blue LED - GPS network connectivity |
 |
If a light is off, unplug the device for approximately 60 seconds and plug the device back in. Initial start-up may take several minutes.
| 1. Check the power supply of the Geotab device in the vehicle | |
| Communication problem with the Geotab device |
|
| 2. Check the information in the Vehicle Identification Sheet | |
| Communication problem with the Geotab device |
|
| 3. Confirm that the device is installed with the correct harness | |
| A red cloud symbol is present next to the vehicle. |
|
| 4. Check for engine faults | |
| Via the Engine & Device tab > Engine & Maintenance > Faults. |
|
| 5. Check the physical installation in the vehicle | |
| Checking in the vehicle |
|
| 6. Perform a full restart cycle of the device | |
| Checking in the vehicle |
|
| 7. Problem solving | |
| Problem resolution |
|